Driveway Restoration: The Systematic Weekend Detail
Driveway detailing fails without a repeatable process. Shift from basic 'cleaning' to professional surface management with our lubricated, three-phase system designed for a flawless, scratch-free finish.
THE DETAIL
4 min read

Achieving a professional finish in a residential driveway requires a workflow that manages the risks of heat and cross-contamination. This guide outlines the logistical steps to decontaminate and seal a vehicle’s exterior, focusing on the mechanical techniques used to pull dirt away from the paint without inducing scratches.
Phase 1: The Perimeter Defense (Wheels & Pre-Wash)
The most common mistake is washing the paint first. If you clean your wheels last, the abrasive brake dust will splash back onto your clean panels.
The Wheel Protocol: While the wheels are cool to the touch, spray each one with a dedicated iron remover. Let it dwell for 2 minutes to chemically dissolve brake dust, then agitate with a soft-bristle brush before rinsing.
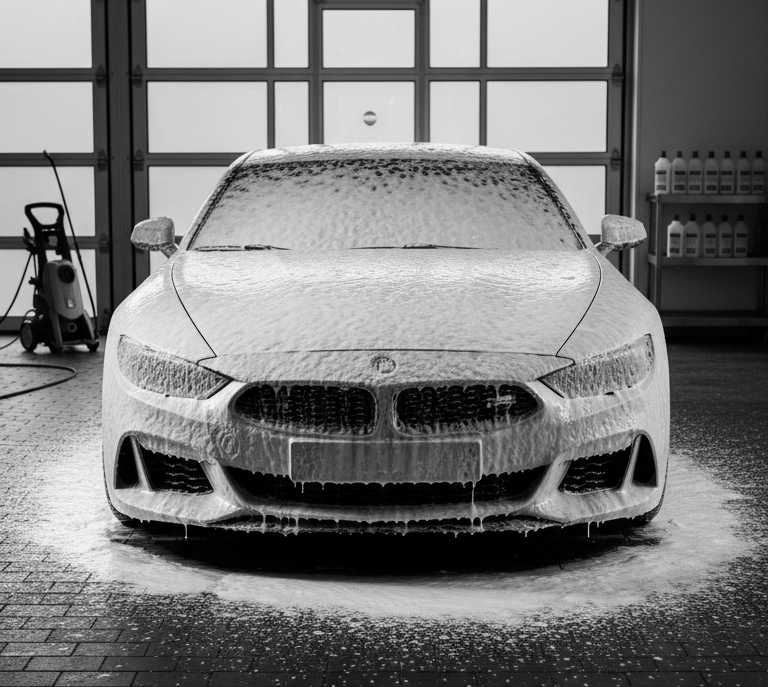
The Pre-Soak: Before touching the car with a wash mitt, you must deploy a thick layer of chemistry to break the static bond between the surface dirt and your clear coat. Utilizing a pressure washer paired with a precision foam cannon allows you to blanket the entire vehicle in dense, clinging foam. Let it dwell for 3 minutes. This encapsulates the heavy grit and road film, allowing it to slide off safely during the initial rinse without inducing micro-scratches.
Phase 2: The Two-Bucket Contact Wash (Logistics of the Mitt)
To maintain the purity of your wash, you must isolate the dirt you’ve already removed from the soapy water you’re about to use.
The Setup: Place a grit trap in the bottom of two 5-gallon buckets. Fill the "Wash" bucket with soap and the "Rinse" bucket with plain water.
Mechanical Execution: Dunk your mitt in the soap and wash one panel at a time, starting from the roof down. Use light, straight-line motions—never circular.
The Reset: After each panel, scrub the mitt against the grit trap in the Rinse bucket to release the dirt. Wring it out before dipping it back into the clean Wash bucket. This ensures you never put a dirty mitt back onto the paint.
Phase 3: The Hydrophobic Lockdown (Sealing & Drying)
Instead of drying the car and then waxing it, we utilize a "drying aid" protocol to add protection while the surface is still wet, which minimizes friction.
The Application: While the car is still dripping wet from the final rinse, spray a synthetic sealant (like Bead Maker) lightly over each panel.
The "One-Pass" Dry: Lay a large, twist-loop microfiber towel flat across the hood or roof. Grab the corners and pull it toward you. The towel’s mass will pull the moisture and the sealant into the pores of the paint simultaneously.
The Final Buff: Use a dry, high-GSM microfiber towel for a final, light buff. This levels the sealant and creates the "wet-look" gloss that defines a professional detail.
The Expert Gear List
To implement this systematic driveway detail, our team utilizes the following professional-grade tools designed for DIY efficiency on Amazon.
Disclosure: The Retrofit Routine is a participant in the Amazon Services LLC Associates Program. As an Amazon Associate, we earn from qualifying purchases at no additional cost to you.
Washing & Decontamination
Chemical Guys Heavy Duty Detailing Bucket: A rugged, 5-gallon bucket that serves as the foundation for the two-bucket system.
Chemical Guys Cyclone Dirt Trap: A technical insert that filters wash water and keeps abrasive grit at the bottom of the bucket.
Meguiar's Gold Class Car Wash: A high-lubricity, pH-neutral soap that provides the "slip" necessary to prevent scratching during the wash.
Slick Products Premium Foam Cannon: Built with heavy-duty brass internals and a durable canister to withstand continuous professional use, this cannon features fully adjustable spray fan and foam dials to control your chemical output. It perfectly atomizes wash soap to blanket the vehicle in dense, clinging foam, safely loosening road film and grime before you ever make physical contact with the paint.
Slick Products Garden Hose Foam Gun: The high-yield pre-soak delivery system for anyone who does not own a pressure washer. Built for repeat driveway use with rugged plastics, brass fittings, and a massive 32-ounce tank, this gun connects directly to any standard residential hose. It features an adjustable foam control dial and a quick-release rinse function, allowing you to instantly blanket your vehicle in thick, clinging suds for a scratch-free pre-soak without investing in expensive machinery.
Slick Products Heavy-Duty Cleaner & Degreaser: The mandatory chemical extraction agent for tires, wheel barrels, and heavily soiled lower panels. Standard car wash soap cannot dissolve baked-on brake dust or road grease. This professional-strength, citrus-based formula cuts through heavy oil and grime on contact. It can be deployed at full strength to reset neglected tires, engine bays, and exhaust tips, or diluted for lighter maintenance washes. It perfectly pairs with your wheel brush to safely lift heavy buildup and create a clean baseline before you apply any tire dressings
Slick Products Premium Non-Scratch Wheel Brush: Engineered with a bendable 15-inch extended reach handle and dense, flagged soft bristles, it safely penetrates deep into complex wheel barrels to lift bonded brake dust and grime. It provides the deep cleaning agitation required to reset your wheels without scratching delicate clear-coated, powder-coated, or chrome finishes.
Protection & Maintenance
P&S Bead Maker Paint Protectant: A high-gloss synthetic sealant that acts as a drying aid and provides extreme water beading.
The Rag Company - The Liquidator (Twist Loop): A dedicated drying towel that pulls moisture off the paint in a single pass.
Chemical Guys Professional Grade Microfiber Towels (3-Pack): Plush, high-GSM towels essential for the safe final buff and interior care.
Contact
Questions? Reach out anytime, we’re here.
© 2026. All rights reserved.
Disclosure
The Retrofit Routine is a participant in the Amazon Services LLC Associates Program. As an Amazon Associate, we earn from qualifying purchases at no additional cost to you.
The Retrofit Routine is a digital property owned and operated by Atlantic Delivery Drivers Corp.