Engine Bay Decontamination: The Chemical Extraction & Surface Protection Protocol
Your engine bay is the most contaminated surface on your vehicle — and the most neglected. Here is the exact citrus degreaser, controlled low-pressure rinse, and component dressing protocol to strip years of baked-on oil mist, road grime, and heat-cycled residue without risking a single electrical component.
THE DETAIL
7 min read
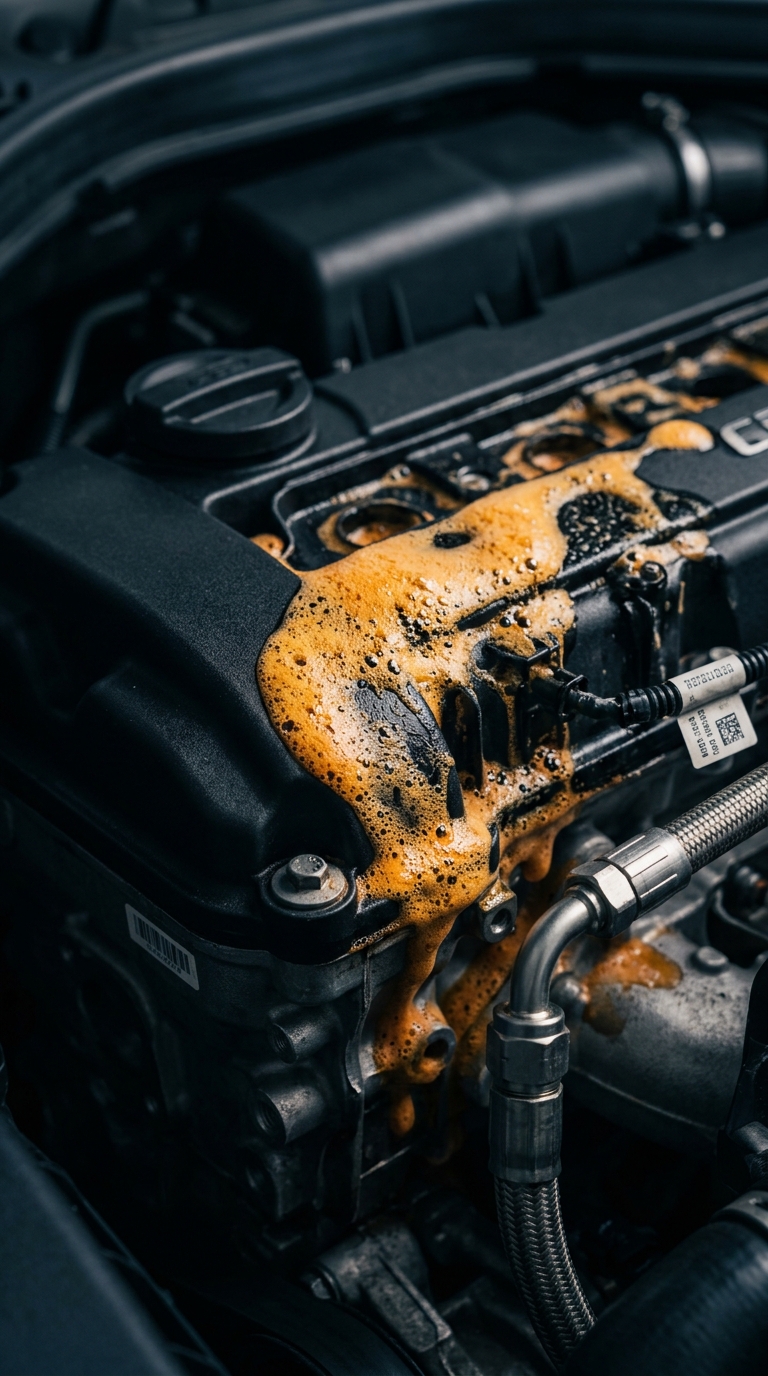
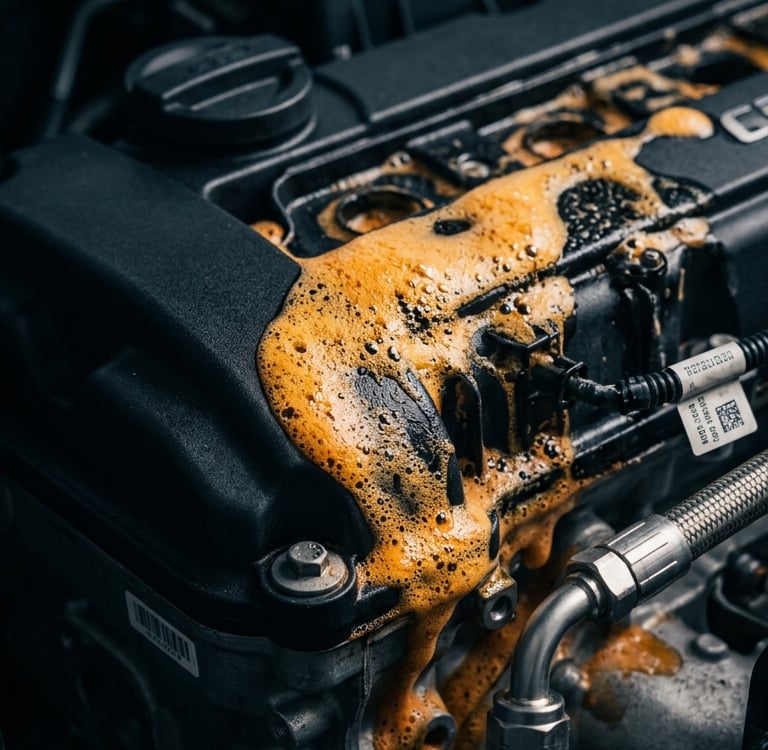
The engine bay is the surface most people never touch. While the exterior gets washed and the interior gets vacuumed, the engine bay accumulates years of oil mist, exhaust fallout, brake dust, and road film in a sealed environment where heat cycles every contaminant onto every surface multiple times per week. The result is a thick, baked-on hydrocarbon layer coating everything from the valve cover to the fuse block — a surface that retains heat, bonds every new oil drip, and makes identifying actual fluid leaks nearly impossible.
Most owners avoid cleaning the engine bay because of a single concern: electrical damage. That concern is legitimate but massively overstated. Modern vehicles are engineered with sealed connectors and waterproof harness routing because they operate in rain, puddles, and automatic car washes every single week. The risk is not water contact — it is high-pressure water impact that forces moisture past sealed connectors into housings not designed to drain. The professional engine bay decontamination protocol eliminates that risk entirely by using chemistry and a controlled low-pressure rinse to extract contamination, not raw pressure.
This guide is the exact three-phase chemical extraction and component protection protocol our team uses to restore an engine bay from years of neglect to a factory-clean baseline in a single afternoon.
Phase 1: Pre-Decontamination Safety Protocol — Creating the Correct Conditions
You cannot degrease an engine running at full operating temperature. Heat flash-dries the degreaser before it penetrates the contamination layer, and cold water contacting a hot engine block creates thermal shock. This phase establishes the exact thermal and electrical conditions required for chemical penetration to work correctly.
The Thermal Window: Allow the engine to cool completely before beginning — a minimum of two hours parked is the baseline. Alternatively, run the engine for five minutes to bring it to a warm operating state, then allow thirty minutes of cooling. A warm engine slightly accelerates chemical penetration. A hot engine destroys it. Do not attempt this protocol on a vehicle that was just driven.
The Electrical Isolation Protocol: Before any liquid contacts the engine bay, identify and protect the highest-risk electrical components in your vehicle. These are the battery terminals and battery housing, the fuse block and relay module — typically a sealed plastic box on one of the inner fenders — the alternator, and any exposed ignition coil harness connectors. Cover each of these components loosely with a plastic bag and painter's tape. The goal is deflection from direct liquid contact, not airtight sealing. Every other component in the bay was engineered to operate in rain and can handle this protocol safely.
The Pre-Dry Extraction: Before any degreaser is applied, use a stiff detailing brush to dislodge the loose accumulation of leaves, grit, debris, and dry dust from the cowl drainage channels, the base of the firewall, and the air intake housing. Wet degreasing loose dry debris does not remove it — it embeds it into lower surfaces and drain channels. Extract the dry particulate first, then wet-degrease the contamination bonded beneath it.
Phase 2: The Chemical Degreasing Phase — Citrus Extraction
This is the core of the protocol. A professional-strength citrus-based degreaser penetrates and emulsifies the baked-on hydrocarbon layer — oil mist, exhaust film, and road chemical buildup — without attacking the rubber hoses, plastic engine covers, and vinyl component labels that a caustic solvent degreaser would degrade over repeated applications.
The Application Sequence: Working from the back of the engine bay forward, apply the degreaser at full strength for a heavily neglected bay or at a 2:1 dilution for annual maintenance. Focus the initial application on the highest contamination zones first: the underside of the hood, the valve cover and cam covers, the firewall behind the engine, and the inner fender wells above the wheel arches. These surfaces carry the densest grease load and require the longest dwell time.
The Dwell Protocol: Allow the degreaser to sit for 3 to 5 minutes on the heaviest surfaces. The product will begin to visibly shift in colour as it emulsifies the hydrocarbon layer. Do not allow the degreaser to dry on the surface — if ambient temperature is above 80°F, mist the treated area lightly with water to extend the dwell cycle. On a neglected bay, apply a second coat during dwell to maintain chemical activity across the entire surface rather than letting the first coat flash-dry in isolated spots.
The Brush Agitation Phase: Using a medium-stiffness detailing brush, agitate the degreaser into the stubborn buildup zones that spray application alone cannot penetrate — around the base of the intake manifold, in the recesses between coolant line brackets, along the top of the transmission housing, and across the corrugated texture of plastic engine covers where grime packs into every valley. The bristles physically break the bond between the heat-cycled residue and the surface, dramatically improving what the rinse phase extracts versus what gets left behind.
The Low-Pressure Rinse: This technique is what separates a professional engine bay wash from one that causes electrical problems. Connect a standard garden hose with a foam gun set to the rinse function — high volume, low impact. Work from the highest point of the bay downward: hood underside first, then the top of the engine, then the firewall and side walls, then the inner fender wells last. The objective is a high-flow, gravity-fed flush that carries the emulsified contamination out of the bay, not a pressure blast that forces moisture into sealed connections. Never use a zero-degree pressure nozzle in the engine bay. If using a pressure washer, maintain a 4-foot standoff distance and use the 40-degree white fan tip exclusively — and never aim directly at the alternator, battery housing, or any exposed electrical connectors.
Phase 3: Component Detailing and Surface Protection
The degreasing phase strips the contamination. This phase restores and protects every surface type in the bay — rubber hoses, plastic covers, painted inner fenders, and bare metal — against the oil vapour, heat cycling, and road spray that will begin recontaminating every surface the moment the vehicle is driven.
The Drying Phase: Allow the engine bay to air dry fully before any protectant is applied. Start the engine and allow it to idle for 5 to 10 minutes — the operating heat draws residual moisture away from electrical connectors and wiring harnesses faster than any towel can. Leave the hood propped open during this idle dry to allow airflow through the bay. If moisture is visible in any connector housing, use a microfiber towel or low-pressure compressed air to extract it before proceeding.
The Precision Detail Pass: Using a dry detailing brush, perform a precision sweep across all component housing surfaces, coolant reservoir caps, brake fluid reservoirs, and the top faces of fuse blocks and relay modules. The degreasing phase removes the heavy buildup. This pass targets the fine residue and dust film that settles into tight geometry around fasteners, bracket mounting points, and component label surfaces where the degreaser dwell and rinse cycle cannot fully extract without agitation.
The Rubber and Plastic Dressing Application: This is the step that transforms a clean engine bay into a restored one. Apply a non-greasy, UV-resistant multi-surface exterior dressing to every rubber hose, plastic engine cover, and painted inner fender surface using a detailing brush to work the product into the surface texture rather than simply coating it. The dressing must penetrate slightly into the material grain to deliver the UV protection that prevents plastic covers from cracking and rubber hoses from surface-drying under the heat cycles of daily operation. Wipe any excess from metal surfaces immediately — pooled dressing on metal attracts dust rather than repelling it.
The Visual Inspection Protocol: Once the dressing is applied and has had 5 minutes to absorb, close the hood and walk away. Open it again under direct daylight or a single overhead work light and inspect every surface zone systematically. Every rubber component should exhibit a uniform, deep black restoration. Every plastic cover should show consistent colour across its entire surface with no dry, chalky patches remaining. The inner fenders should appear clean and lightly protected rather than coated. Any missed zones — common around the base of the firewall and behind the coolant reservoir — are immediately visible at this stage and take 30 seconds to address before the dressing fully cures.
The Expert Gear List
To execute this complete engine bay decontamination protocol, our team deploys the following professional-grade chemistry and hardware. All items are available on Amazon.
Disclosure: The Retrofit Routine is a participant in the Amazon Services LLC Associates Program. As an Amazon Associate, we earn from qualifying purchases at no additional cost to you.
Chemical Degreasing
Slick Products Heavy-Duty Cleaner & Degreaser: The mandatory chemical extraction agent for engine bay decontamination. Standard car wash soap cannot dissolve heat-cycled oil mist or hydrocarbon buildup baked onto metal and plastic surfaces across thousands of heat cycles. This professional-strength, citrus-based formula cuts through heavy oil, exhaust film, and road chemical residue on contact without degrading rubber hoses, plastic engine covers, or vinyl component labels. Deploy at full strength on neglected bays and dilute 2:1 for annual maintenance decontamination. The same product used in the wheel barrel and lower panel extraction protocols throughout this guide library.
Rinse Delivery
Slick Products Garden Hose Foam Gun: The low-pressure rinse delivery system for engine bay work. Connected to a standard residential hose and set to the rinse function, it delivers the high-volume, low-impact water flow required to flush emulsified degreaser and contamination out of the bay via gravity rather than pressure. The 32-ounce tank and adjustable dial allow you to switch instantly between a foam pre-soak delivery for exterior panels and a clean rinse cycle for the engine bay — no additional hardware required.
Agitation & Precision Detailing
Nurkul Detailing Brush Set, 11-Piece: The complete brush set for both the chemical agitation phase and the post-rinse precision detail pass. Wide flat brushes agitate degreaser across valve covers and firewall surfaces. Narrow pointed brushes reach the recesses around intake manifold fasteners, coolant line brackets, and relay block mounting points where standard brushes cannot reach. The full set eliminates the temptation to use a single brush size that either damages delicate component labels or fails to reach tight geometry in the back of the bay.
Surface Protection
Slick Products Multi-Surface Exterior Dressing: The finishing step that transforms a clean engine bay into a fully restored one. Non-greasy, UV-resistant formula penetrates rubber hoses, plastic engine covers, and painted inner fender surfaces to restore original colour depth and deposit a protective barrier against heat cycling, ozone degradation, and road spray. Applied with a detailing brush for texture penetration rather than surface coating — producing a uniform, deep restoration across all components rather than a wet, silicone-heavy shine that attracts dust.
Drying
Mighty Cleaner Premium XL Shammy Towel: High-capacity water extraction tool for the post-rinse drying phase on accessible surfaces — hood underside, valve covers, and inner fender panels — before engine heat finishes the process on component housings and wiring channels. The extra-large PVA format absorbs residual surface moisture without leaving lint on precision-cleaned engine components.
Contact
Questions? Reach out anytime, we’re here.
© 2026. All rights reserved.
Disclosure
The Retrofit Routine is a participant in the Amazon Services LLC Associates Program. As an Amazon Associate, we earn from qualifying purchases at no additional cost to you.
The Retrofit Routine is a digital property owned and operated by Atlantic Delivery Drivers Corp.