Refresh Your Heat Pump: The 15-Minute Mini-Split Deep Clean
That musty smell when your mini-split kicks on is not the unit aging — it is years of accumulated biological growth being pushed directly into your living space. Get the exact filter extraction, foaming coil treatment, drain pan flush, and blade decontamination protocol to restore full airflow efficiency and eliminate the contamination at its source.
THE RETROFIT
9 min read
If you rely on a ductless mini-split heat pump to heat and cool your home, it has been operating as a continuous air circulation system through every season — pulling air in, conditioning it, and pushing it back out through the same internal infrastructure every single day. The problem is that every cubic foot of air passing through that unit carries with it airborne particulate, biological spores, dust mite debris, skin cell fragments, and atmospheric moisture. Over a single heating season, this material accumulates across the evaporator coil, the blower wheel, the filter mesh, and the drain pan into a compacted contamination layer that your mini-split's internal components were never designed to self-clean.
The result is predictable. The musty, stale odour that appears when the unit first activates in spring is not a mechanical issue and it is not the unit aging. It is the direct smell of biological growth — mould colonies and bacterial biofilm that have established themselves on the evaporator fin surfaces and inside the drain pan during the off-season — being pushed at high velocity directly into your living space every time the fan runs. Meanwhile, the compacted particulate load on the coil is acting as an insulation layer between the refrigerant-cooled fins and the room air they are supposed to condition, forcing the unit to run longer cycles to achieve the same temperature — inflating your electricity bill while reducing system lifespan.
Most homeowners respond to this by calling an HVAC technician for a $150 to $200 cleaning visit that consists of removing the filter and spraying a single can of coil cleaner. This guide is the exact self-executing protocol that accomplishes the same outcome — and then goes further.
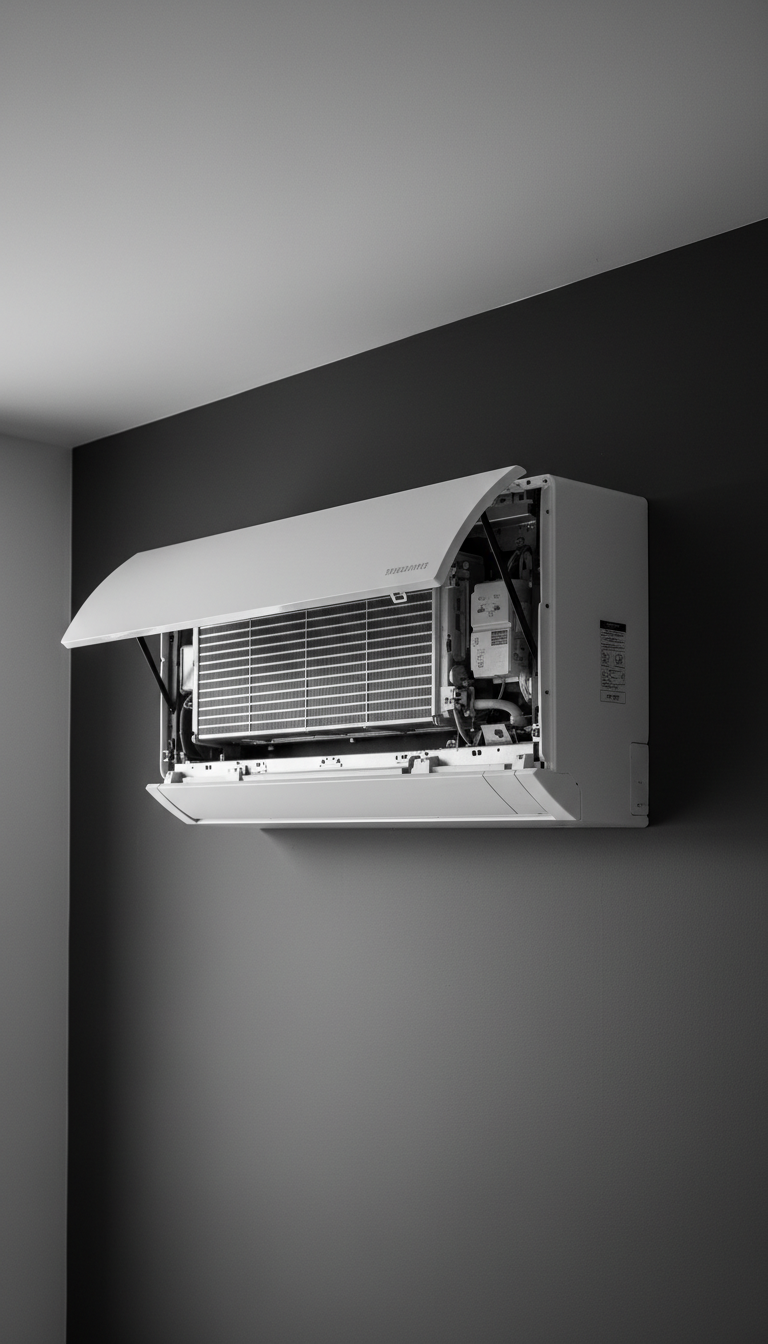
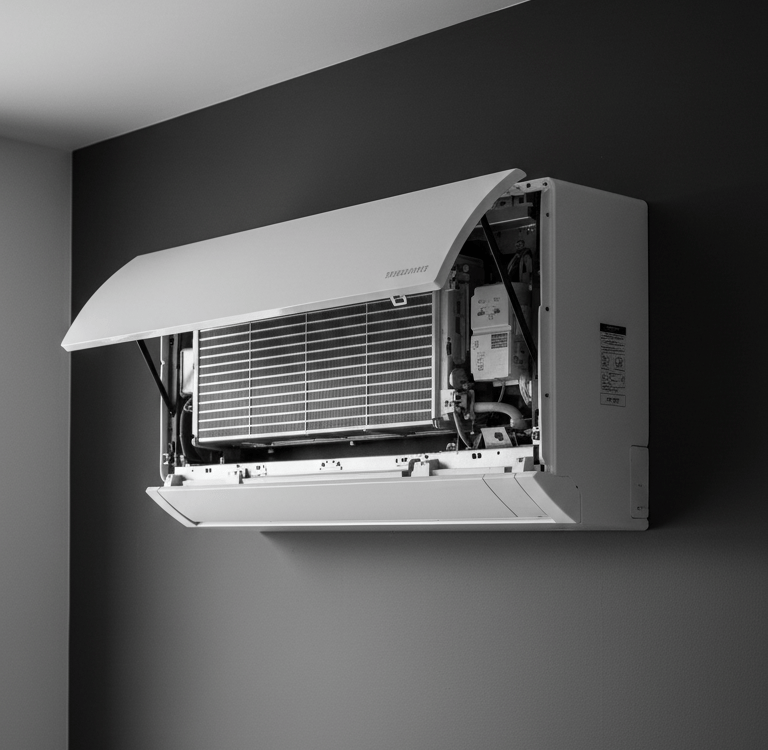
Phase 1: System Isolation & Component Extraction
You cannot safely execute any chemical treatment on a live electrical system. This phase establishes the zero-trust electrical baseline and extracts every accessible component for inspection before any chemistry is deployed.
The Electrical Isolation: Go to your main electrical panel and identify the dedicated circuit breaker for the indoor mini-split head. Flip it to the off position. Return to the unit and attempt to power it on from the wall control or remote — if it does not respond, the circuit is confirmed dead. Do not rely on simply switching the unit off with the remote — the control board remains energised on standby power and the circuit must be physically broken at the panel before any panel removal or chemical contact occurs.
The Front Panel Removal: Locate the two or three clips securing the front plastic housing to the unit body — typically positioned at the top corners and centre top of the housing. Squeeze each clip inward while lifting the panel upward. The panel will hinge open on its lower mounts. Do not attempt to fully detach it from the unit — on most residential mini-split heads it is designed to hinge open approximately 70 to 90 degrees and remain attached. If the panel feels resistant, check for a retaining clip at the centre top that is not fully released before applying further force.
The Filter Extraction: With the front panel open, you will see two curved plastic mesh filter panels sitting against the face of the evaporator coil — one on each side of the unit. Slide each filter toward the centre of the unit and lift it free of its retaining channel. Take note of which side each filter came from. Inspect each filter under direct light. A filter that appears visibly grey or brown is carrying a contamination load that is actively restricting airflow through the coil. A filter that appears completely black has been in service past its cleaning interval and may need replacement rather than cleaning.
The Filter Rinse Protocol: Take both filters to a utility sink or outdoor hose area. Rinse from the backside — the side that faces the coil — so that water pressure pushes accumulated debris forward and out through the mesh rather than driving it deeper into the grid. Run warm water through the back face until the runoff water clears completely. Never scrub filter mesh with a brush — the physical abrasion degrades the mesh aperture and reduces the filter's capture efficiency permanently. Allow the filters to air dry completely before reinstallation. Never reinstall a wet filter — residual moisture on the filter surface creates a condensation trap that accelerates mould growth on the coil face directly behind it.
Phase 2: The Coil Treatment — Foaming Chemical Decontamination
The evaporator coil is the core contamination zone in any mini-split head. It is the surface where the refrigerant-cooled fins create the condensation that all biological growth in the unit requires to establish itself, and it is the surface that directly conditions every cubic foot of air the unit delivers into the room.
Understanding the Coil Architecture: The evaporator coil in a mini-split head is composed of hundreds of razor-thin aluminium fins arranged in tight parallel rows across the full width of the unit. These fins are designed to maximise surface area contact between the refrigerant-cooled metal and the room air being conditioned. This same dense fin geometry is also what makes the coil impossible to clean manually — the fin channels are typically 1 to 2 millimetres apart and any mechanical contact risks bending individual fins, which collapses the channel and permanently reduces airflow. Chemical foam is the only safe and effective cleaning medium for this surface.
The Fin Inspection: Before applying any chemistry, look directly at the coil face under a work light or phone torch. The fin surface should appear uniformly silver-grey with open channels between each fin row. A coil with biological contamination will show dark green, black, or brown discolouration between the fin rows — a visible mould colony that has established inside the channel geometry where it cannot be physically removed. A coil with significant particulate loading will have visibly reduced channel openings where the air passage has been progressively narrowed by compacted debris.
The Coil Cleaner Application: Load a can of no-rinse foaming evaporator coil cleaner. Hold the can approximately 4 to 6 inches from the coil face and apply the foam in a steady, left-to-right horizontal pass across the full width of the coil from top to bottom. Work in slow, overlapping passes so that every section of the coil face receives foam coverage. The foam will expand immediately on contact and penetrate into the fin channels under its own pressure — this is the mechanism that reaches the biological growth and compacted debris that is inaccessible to any other cleaning method. Do not wipe, brush, or agitate the foam. Allow it to work undisturbed.
The Chemistry Dwell Phase: The coil cleaner requires a minimum of 5 to 8 minutes of undisturbed dwell time to dissolve the biological growth, break the adhesion of compacted debris, and suspend the extracted contamination in the liquid phase. You will observe the foam beginning to darken or discolour as it works — this is the dissolved contamination being suspended by the chemistry. On a heavily contaminated coil, a second application after the first has fully drained will produce additional contamination release. The no-rinse formula is specifically designed to liquefy the dissolved material and allow it to drain via the unit's internal condensate system into the drain pan below without requiring a water rinse — this is the mechanism that makes the protocol safe for an installed electrical unit.
The Blower Wheel — The Hidden Contamination Zone: Behind the coil and below the front panel, the mini-split's blower wheel — the cylindrical fan that drives air through the unit — is one of the highest-contamination surfaces in the entire system and the one most commonly neglected in a standard cleaning. The blower wheel accumulates a thick black coating of biological growth and particulate on its fan blades over time. This coating has two direct consequences: it reduces the fan's aerodynamic efficiency by changing the blade profile, which increases the power draw required to move the same volume of air; and it launches biological debris directly into the airstream at high velocity every time the fan runs. Use a narrow soft-bristle detailing brush to physically agitate the visible surface of the accessible blade sections, dislodging the contamination layer for drainage into the drain pan. Apply a light spray of coil cleaner to the wheel surface after brushing.
Phase 3: The Drain Pan Flush & Component Restoration
The coil cleaning phase dissolves and suspends contamination. This phase extracts that contamination completely from the unit and restores the system's drainage infrastructure — the component that, if neglected, produces the standing water that drives every biological growth cycle in the unit.
The Drain Pan Inspection: The drain pan sits directly below the evaporator coil and collects the condensate that forms on the coil fins during cooling operation. Over time, the drain pan accumulates a combination of biological growth, dissolved mineral scale from condensate, and the debris released by coil cleaning cycles that did not drain completely. With the front panel open, use a torch to inspect the visible section of the drain pan below the coil. Any visible standing water, dark discolouration, or biological growth in the pan indicates a drainage system that is functioning at reduced capacity — the condition that enables the contamination cycle to restart within days of a cleaning.
The Drain Pan Chemical Treatment: Apply a targeted spray of the no-rinse coil cleaner directly into the drain pan. The chemistry will dissolve biological growth on the pan surface and suspend mineral scale deposits for drainage. If the drain outlet — typically a 3/4-inch plastic port at one end of the pan — shows visible blockage or organic debris, use a narrow cleaning brush to clear the port before the chemical treatment is applied. A partially blocked drain port is the single most common cause of water overflow events in residential mini-split systems.
The Drainage Confirmation: With the coil treatment fully applied and the drain pan treated, restore power to the unit at the main panel. Switch the unit to its FAN ONLY mode — not cooling or heating. Run the unit on fan at high speed for a minimum of 10 minutes. This accomplishes two things simultaneously. The airflow through the coil face accelerates the draining of the dissolved contamination from the coil channels into the drain pan, and the condensate drainage system actively flushes the treated drain pan under live operating conditions. Observe the condensate drain line outlet — the small pipe or hose exiting the unit housing — for active drainage flow during this cycle. Active flow confirms the drain system is clear and functional.
Phase 4: Component Reassembly & System Verification
The Fin Straightening Assessment: Before reinstalling the filters and closing the panel, inspect the full coil face under direct light for any bent or collapsed fin sections. Bent fins — identifiable as sections where the fin rows are not uniformly parallel — are common on any unit that has had physical contact with cleaning tools applied directly to the coil face. Even minor fin collapse on a small section of the coil reduces airflow through that section and creates a performance dead zone. A fin straightening comb — a metal tool with calibrated tines sized to the specific fin spacing of your unit — slides between the fin rows and restores parallel alignment in approximately 30 seconds per affected section without risk of coil damage.
The Filter Reinstallation: Confirm both filter panels are completely dry before reinstalling. A wet filter reinstalled into a freshly cleaned coil immediately creates the condensation environment that re-establishes mould growth. Slide each filter into its retaining channel from the centre of the unit outward and confirm it seats flat against the coil face across its full surface area. A filter that sits proud of its mounting channel at any point is leaving an unfiltered bypass gap that will deposit unfiltered air directly onto the cleaned coil face.
The Outer Housing Wipe-Down: Using a soft microfiber towel, wipe the outer plastic housing of the unit — the vent louvres, the control panel face, the intake grille, and the chassis sides. The outer housing accumulates dust and skin cell deposits that create the grimy, neglected appearance that carries across to the visual first impression of the entire room it serves. Snap the front panel back into its closed position and confirm all retention clips are fully engaged before restoring power.
The Performance Verification: With the unit powered on and the front panel closed, run the system on cooling mode at maximum fan speed for five minutes. Stand directly in the airstream and assess the output. A successfully cleaned unit should produce noticeably higher airflow volume from the same fan speed setting — the direct result of clearing the contamination restriction from the coil channels and fan blades. The odour that was present before the cleaning should be completely absent. Any remaining musty smell after the full protocol indicates biological growth inside the blower housing or drain line that requires a professional disassembly cleaning rather than the accessible surface protocol this guide covers.
The Expert Gear List
To execute this complete mini-split deep clean protocol, our team deploys the following professional-grade chemistry and hardware. All items are available on Amazon.
Disclosure: The Retrofit Routine is a participant in the Amazon Services LLC Associates Program. As an Amazon Associate, we earn from qualifying purchases at no additional cost to you.
Chemical Extraction
Nu-Calgon Evap Foam No-Rinse Coil Cleaner: The professional-grade foaming coil cleaner used across residential and commercial HVAC maintenance. Expands on contact to penetrate the full depth of the evaporator fin channels and dissolve biological growth, compacted particulate, and organic debris without requiring a water rinse — which would make the product unsafe for installed electrical components. The no-rinse formula is specifically engineered to liquefy dissolved contamination and route it through the unit's existing condensate drainage system. The product HVAC technicians use on a $150 service call is this same can.
Mechanical Agitation & Precision
All-Purpose HVAC Coil Cleaning Brush: A soft-bristle brush with tines calibrated to navigate the fin geometry of residential mini-split evaporator coils without inducing fin collapse. Used specifically for the blower wheel surface agitation phase — the mechanical cleaning step that removes the thick biological coating from the fan blades that coil foam cannot penetrate at the required contact pressure. Never use this brush directly on the coil fin face.
Malco FCR6 Fin Straightener Comb: The mandatory restoration tool for any fin section that has been bent or collapsed by physical contact during previous cleaning attempts or impacts. The calibrated metal tines are sized to the standard fin spacing of residential mini-split evaporator coils and restore parallel fin alignment without risk of puncturing the refrigerant tubing beneath. A collapsed fin section that goes unaddressed after cleaning becomes a permanent dead zone in the coil's airflow capacity.
Surface Finishing
Chemical Guys Professional Grade Microfiber Towels: The outer housing wipe-down requires a lint-free, non-abrasive microfiber towel that will not scratch the high-gloss plastic finish of the mini-split housing or leave fibre deposits on the louvre surfaces. Standard paper towels and household cleaning rags both leave lint deposits that are immediately visible on the gloss plastic.
Contact
Questions? Reach out anytime, we’re here.
© 2026. All rights reserved.
Disclosure
The Retrofit Routine is a participant in the Amazon Services LLC Associates Program. As an Amazon Associate, we earn from qualifying purchases at no additional cost to you.
The Retrofit Routine is a digital property owned and operated by Atlantic Delivery Drivers Corp.