The Bathroom Exhaust Fan Upgrade: Eliminating Moisture Before It Becomes Mould
Your bathroom exhaust fan is not removing moisture — it is recirculating it. Get the exact CFM calculation, wiring swap, and humidity-sensing fan installation protocol to permanently eliminate the moisture source behind peeling paint, ceiling mould, and wood rot before summer humidity season arrives.
THE RETROFIT
6 min read

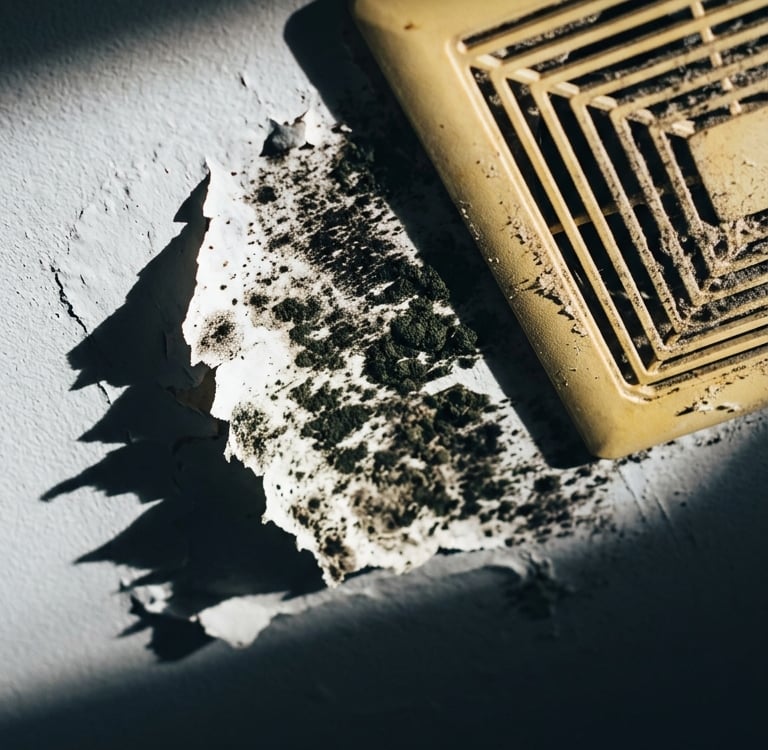
The exhaust fan in your bathroom is one of the most neglected mechanical components in any legacy home. Builder-grade fans installed during original construction are typically rated at 50 CFM — cubic feet per minute of air movement — which was the minimum code requirement at the time and is completely inadequate for any bathroom larger than a small powder room. These underpowered units run loudly, move barely enough air to clear steam from a mirror, and leave the remaining moisture to settle into the ceiling drywall, penetrate the paint, and feed the mould colony that eventually appears as black spots around the light fixture.
The consequences compound quietly. Bathroom ceiling mould is not cosmetic — it is structural. Moisture that the exhaust fan fails to remove migrates into the ceiling cavity, saturates the insulation above the bathroom, and begins degrading the ceiling joists and subfloor of the room above. In a high-capacity household where the bathroom sees heavy daily use, an undersized exhaust fan is one of the fastest ways to generate a $3,000 to $8,000 remediation bill from a problem that a $60 fan replacement would have prevented.
This guide is the exact protocol to calculate the correct CFM rating for your bathroom, remove the legacy unit, and install a modern humidity-sensing exhaust fan that activates automatically when moisture is detected and shuts off only when the air is fully cleared — requiring zero behavioural change from anyone in the household.
Phase 1: The Diagnostic — CFM Calculation & Moisture Assessment
You cannot fix an airflow problem you have not measured. The first step is determining exactly how much air movement your bathroom requires and comparing that against what your current unit delivers.
The CFM Calculation: The industry standard formula for bathroom ventilation is 1 CFM per square foot of floor space for bathrooms up to 100 square feet. Multiply the length of your bathroom by the width to get the square footage, then match that number to the minimum CFM rating for your replacement fan. A 8 by 10 foot bathroom requires a minimum 80 CFM fan. A 10 by 12 foot bathroom requires 120 CFM. For bathrooms with a separate toilet compartment, add 50 CFM to the base calculation. For bathrooms with a jetted tub or steam shower, add another 50 CFM. Your replacement fan should meet or exceed this number — never select a fan rated below the calculated requirement.
The Legacy Unit Assessment: Remove the grille cover from your existing exhaust fan by squeezing the mounting springs and pulling it down. The CFM rating and model number are printed on a label inside the housing. If the existing unit is rated below your CFM calculation — which it almost certainly is in any legacy build — replacement is the correct protocol. If the unit is appropriately rated but still underperforming, the ductwork connecting the fan to the exterior vent may be kinked, obstructed, or disconnected in the attic space.
The Moisture Damage Inspection: While the grille is removed, inspect the ceiling drywall immediately surrounding the fan housing. Press firmly on the drywall surface with your thumb. Soft, spongy, or crumbling drywall indicates active moisture damage and must be addressed before installing a new fan — a new fan installed over saturated drywall will not stop the structural degradation already underway. Any visible black spotting on the ceiling paint within 18 inches of the fan housing is a mould indicator that requires chemical treatment before the replacement is installed.
Phase 2: The Extraction & Wiring Preparation
Bathroom exhaust fan replacement is one of the most accessible electrical DIY tasks in residential maintenance — the wiring is simple, the voltages are low, and the physical access through the ceiling grille opening makes the job achievable without attic access in most cases.
The Circuit Isolation: Go to your main electrical panel and identify the circuit breaker controlling the bathroom. Flip it to the off position. Return to the bathroom and attempt to switch the fan on — if it does not activate, the circuit is confirmed dead. Do not proceed until the circuit is verified off. Use a non-contact voltage tester probed into the fan's wire connection compartment to confirm zero voltage before touching any copper.
The Legacy Unit Extraction: With the grille already removed, locate the mounting screws securing the fan housing to the ceiling joist or mounting bracket. Back them out and carefully lower the housing. Inside you will find a wire connection compartment — unscrew the cover and untwist the wire nuts connecting the house wiring to the fan motor leads. Note which wire connects to which before disconnecting — white to white neutral, black to black hot, bare copper or green to ground. If the existing unit is connected to a separate light fixture on the same circuit, photograph the wiring configuration before disconnecting.
The Duct Inspection: Before installing the new unit, inspect the flexible duct connecting the fan housing to the exterior vent cap. Squeeze along the full length of the duct to check for kinks or compressions — a kinked duct reduces airflow by up to 50 percent regardless of the fan's rated CFM. If the duct is damaged, kinked, or less than 4 inches in diameter, replace it before installing the new fan. A correctly rated fan connected to a compromised duct will never perform to its specification.
Phase 3: The Humidity-Sensing Fan Installation
A standard exhaust fan that requires manual operation will be forgotten by household members, left off during showers, and switched off before the moisture has fully cleared. A humidity-sensing fan eliminates this failure point entirely by automating the moisture response.
The Humidity Sensor Function: Modern humidity-sensing exhaust fans contain a built-in hygrometer that continuously monitors the ambient moisture level in the bathroom. When humidity rises above a preset threshold — typically 50 to 60 percent relative humidity — the fan activates automatically regardless of whether the wall switch is on. It continues running until the humidity drops back below the threshold, ensuring complete moisture removal every single time the bathroom is used without requiring any action from the occupant.
The Housing Installation: Secure the new fan housing to the ceiling joist using the included mounting bracket and screws. Most modern replacement fans are designed as universal replacements and will fit the existing duct connection and ceiling cutout without modification. Connect the house wiring to the fan leads using the included wire nuts — white to white, black to black, ground to ground. Tuck the connections into the wire compartment and secure the cover.
The Sensor Calibration: Most humidity-sensing fans have an adjustable sensitivity dial inside the housing — typically marked from Low to High corresponding to the humidity threshold that triggers activation. Set the dial to the midpoint for standard bathroom use. In high-capacity households where multiple people shower in rapid succession, set the sensitivity one position higher to ensure the fan activates early enough to prevent moisture saturation between uses.
The Grille Installation and Verification: Snap the grille cover into the mounting springs and restore power at the main breaker. Switch the fan on manually to verify motor operation. Then test the humidity sensor by holding a damp towel near the grille for 30 seconds — the fan should activate within 1 to 2 minutes as the sensor detects the elevated moisture level. If the sensor does not trigger, increase the sensitivity setting one position and retest.
The Expert Gear List
To execute this complete bathroom exhaust fan upgrade, our team deploys the following professional-grade hardware. All items are available on Amazon.
Disclosure: The Retrofit Routine is a participant in the Amazon Services LLC Associates Program. As an Amazon Associate, we earn from qualifying purchases at no additional cost to you.
Diagnostics & Safety
Klein Tools Non-Contact Voltage Tester: The mandatory zero-trust diagnostic tool for verifying a dead circuit before touching any wiring. Provides visual and audible confirmation of zero voltage at the fan's wire connection compartment before extraction begins. The same tool used in the Lumen Optimization fixture retrofit protocol — one purchase covers every electrical DIY task in the home.
Fan Hardware
Broan-NuTone Humidity Sensing Exhaust Fan (110 CFM): A professional-grade humidity-sensing bathroom exhaust fan that activates automatically when moisture is detected and runs until the air is fully cleared. 110 CFM output handles bathrooms up to 110 square feet. Ultra-quiet 0.3 sone motor operation — effectively silent during normal use. Installs as a direct replacement for most standard builder-grade fan housings without duct modification.
Wiring & Connection
Wago 221 Lever-Nuts Assorted Pack: The modern gold standard for wire splicing. Transparent mechanical lever-nuts that completely replace outdated twist-on wire nuts for the fan motor lead connections. The same connector system used in the Lumen Optimization protocol — allows tool-free, pull-proof wire connections in seconds with zero guesswork in a tight ceiling cavity.
Duct Sealing
3M 3340 Foil HVAC Tape: A mandatory seal for all duct connections at the fan housing collar and exterior vent cap. Unsealed duct joints allow moist bathroom air to escape into the ceiling cavity rather than exhausting to the exterior — directly defeating the purpose of the fan upgrade. HVAC foil tape creates a permanent, airtight seal at every duct joint that outlasts standard duct tape by decades.
Contact
Questions? Reach out anytime, we’re here.
© 2026. All rights reserved.
Disclosure
The Retrofit Routine is a participant in the Amazon Services LLC Associates Program. As an Amazon Associate, we earn from qualifying purchases at no additional cost to you.
The Retrofit Routine is a digital property owned and operated by Atlantic Delivery Drivers Corp.