The Foundation Seal: Systemizing Rim Joist Insulation
Stop the massive thermal bleed at the base of your home. Learn the rigid board and expanding polyurethane protocol to permanently air-seal the most vulnerable gap in legacy architecture.
THE RETROFIT
2 min read
The most significant point of failure in a home's thermal envelope isn't the windows; it is the rim joist. In legacy architecture—particularly homes built in the 1970s and earlier—the perimeter where the wooden house framing meets the concrete basement foundation was rarely air-sealed. This creates a massive structural gap. Due to the "stack effect," warm air rising into your upper levels physically vacuums freezing outside air straight through this basement gap.
Stuffing pink fiberglass batts into these joist bays is a structural failure. Fiberglass filters air; it does not stop it. To permanently eliminate this draft, you must shift from "insulating" to "air-sealing." This guide outlines the technical protocol for creating an impenetrable vapor and thermal barrier at the base of your home.
Phase 1: The Teardown and Diagnostics
You cannot seal over failing infrastructure. The first step is completely stripping the joist bays back to the bare wood and concrete.
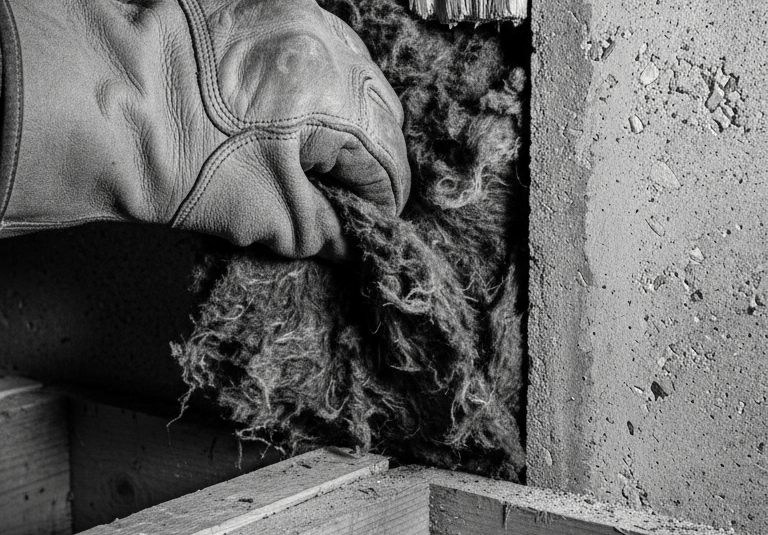
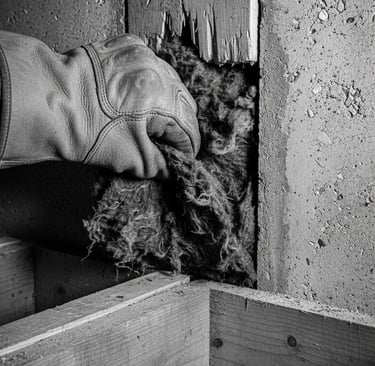
Extraction: Pull out and discard any legacy fiberglass insulation. It is likely black with dust—visible proof that air has been freely flowing through it for decades.
Surface Decontamination: Use a high-powered wet/dry vacuum to extract the accumulated cobwebs, sawdust, and masonry dust from the sill plate. Polyurethane foam requires a clean, structurally sound surface to achieve a chemical bond.
Phase 2: The Structural Backer (Rigid Foam)
Instead of trying to fill a massive void entirely with spray foam, we utilize rigid extruded polystyrene (XPS) board to create a high R-value structural plug.
Precision Cutting: Measure the internal dimensions of each joist bay. Using a heavy-duty utility knife, cut blocks of 2-inch XPS foam board roughly 1/2 inch smaller than the opening.
The Dry Fit: Push the rigid foam block into the bay, pressing it flat against the exterior rim board. The 1/2-inch gap around the perimeter is intentional; this creates the channel for the expanding lockdown phase.
Phase 3: The Expanding Lockdown (Air-Sealing)
This is the phase that actually stops the drafts. We use a professional-grade closed-cell polyurethane foam to lock the rigid board into place and permanently seal the envelope.
Perimeter Injection: Using a professional foam dispensing gun, inject the polyurethane sealant around the 1/2-inch gap between your rigid foam block and the wooden floor joists.
The Curing Phase: The foam will rapidly expand to fill every micro-crack and masonry imperfection, creating a flawless, waterproof, and airtight gasket. Once cured, the basement is structurally isolated from exterior temperature swings.
The Expert Gear List
To execute this foundation lockdown, our team utilizes the following professional-grade materials and hardware on Amazon.
Disclosure: The Retrofit Routine is a participant in the Amazon Services LLC Associates Program. As an Amazon Associate, we earn from qualifying purchases at no additional cost to you.
Preparation & Diagnostics
DeWalt Retractable Utility Knife: A heavy-duty, fixed-blade tool essential for cleanly slicing through dense, 2-inch rigid foam board without snapping the blade.
Craftsman 16 Gallon Heavy-Duty Shop-Vac: High-capacity extraction hardware required to rapidly decontaminate the sill plate before chemical sealing.
Insulation & Sealing
Great Stuff Pro Gaps & Cracks Dispensing Gun: A professional-grade, teflon-coated applicator gun. Unlike disposable straw cans, this allows for precision trigger control and zero waste when running long perimeter beads.
Great Stuff Pro Gaps & Cracks Polyurethane Foam (24 oz): High-expansion, closed-cell foam engineered to create an airtight, water-resistant bond between wood framing and masonry.
Contact
Questions? Reach out anytime, we’re here.
© 2026. All rights reserved.
Disclosure
The Retrofit Routine is a participant in the Amazon Services LLC Associates Program. As an Amazon Associate, we earn from qualifying purchases at no additional cost to you.
The Retrofit Routine is a digital property owned and operated by Atlantic Delivery Drivers Corp.