The Water Heater Protocol: Anode Rod Replacement & Tank Maintenance Before It Fails
A $25 anode rod is the only thing standing between your water heater and a $1,200 emergency replacement. Get the exact diagnostic, flush, and anode rod replacement protocol to extend your tank's lifespan by 5 to 10 years before the failure point arrives.
THE RETROFIT
6 min read
Your water heater has a self-destruct mechanism built into it. Inside every tank-style water heater is a magnesium or aluminum anode rod — a sacrificial metal component engineered to corrode so your tank does not. As long as the anode rod is intact, it attracts the electrochemical corrosion that would otherwise eat through the steel tank lining. When the anode rod is fully depleted, that corrosion turns directly on the tank itself. Within 1 to 3 years of a depleted anode rod, the tank rusts from the inside out, develops a pinhole leak, and fails — typically flooding your utility room on a Tuesday morning while you are at work.
A replacement anode rod costs $25 to $40 and takes 30 minutes to install. A new water heater costs $800 to $1,500 for the unit alone plus $300 to $500 in installation labour. The anode rod should be inspected every 3 to 5 years and replaced when depleted. Most homeowners have never touched theirs. This guide is the exact diagnostic and maintenance protocol to assess your tank's condition, flush accumulated sediment that destroys heating efficiency, and install a fresh anode rod before the failure window opens.
Phase 1: The Tank Diagnostic — Assessing Current Condition
Before touching the tank, you need to understand what you are working with. The age of the unit, the condition of the existing anode rod, and the severity of sediment accumulation all determine how aggressive the maintenance protocol needs to be.
The Age Assessment: Locate the serial number sticker on the side of your water heater. The first four digits typically encode the manufacture date — the first two digits are the week of the year and the next two are the year, though this varies by manufacturer. If your tank is over 8 years old and has never had an anode rod replacement, assume the rod is fully depleted and proceed with full replacement. If the tank is under 5 years old, the rod may still have serviceable life but inspection is still warranted.
The Sediment Audit: Turn on a hot water tap anywhere in the house and let it run for 30 seconds. If the water runs slightly discoloured, has a metallic taste, or produces a rotten egg odour, these are indicators of advanced sediment accumulation and bacterial growth in the tank. Discolouration indicates rust particles from a corroding tank or anode rod. Rotten egg odour is produced by sulphate-reducing bacteria feeding on a depleted magnesium anode rod — a direct signal that the rod needs immediate replacement.
The Pressure Relief Valve Test: Locate the temperature and pressure relief valve on the side of the tank. This safety valve prevents catastrophic tank failure if the pressure or temperature exceeds safe limits. Lift the test lever briefly and release it. Water should flow freely and stop cleanly when the lever is released. If the valve drips continuously after the test, it has failed and must be replaced before proceeding with any other maintenance. A failed pressure relief valve is a structural safety issue.
Phase 2: The Sediment Flush — Efficiency Restoration
Sediment accumulation at the base of the tank is one of the most commonly ignored causes of high energy bills in legacy homes. Calcium and magnesium minerals from hard water precipitate out of solution when heated and settle at the bottom of the tank, forming an insulating layer between the burner and the water. The heating element or burner must work significantly harder and longer to heat water through this sediment layer — directly inflating your gas or electricity bill every single month.
The Pre-Flush Setup: Turn the thermostat dial on the water heater to the Pilot or Vacation setting — do not turn the unit completely off. This prevents the burner from firing during the flush while keeping the pilot light active. Connect a standard garden hose to the drain valve at the base of the tank and route the hose to a floor drain, utility sink, or exterior drain point. The water exiting the tank will be hot — keep the hose end away from people and pets.
The Cold Water Flush: Turn off the cold water supply inlet to the tank using the shutoff valve on the cold supply line above the tank. Open the drain valve and allow the tank to drain completely. Once drained, briefly open the cold water supply valve in short bursts — 10 seconds on, 10 seconds off — to agitate and flush the settled sediment from the tank floor. Repeat this flush cycle until the water running from the drain hose is completely clear with no visible sediment particles.
The Drain Valve Check: While the tank is drained, inspect the drain valve for drips or weeping around the valve body. Original plastic drain valves on older tanks frequently crack or fail to close completely after their first use in years. If the valve does not close cleanly after the flush, replace it immediately with a brass ball valve while the tank is empty — a dripping drain valve on a full hot water tank is a continuous water damage risk.
Phase 3: The Anode Rod Replacement — Corrosion Defense Reset
This is the core of the protocol and the single most impactful maintenance action you can perform on a water heater. Replacing a depleted anode rod resets the corrosion protection system and can add 5 to 10 years of additional service life to a tank that is otherwise structurally sound.
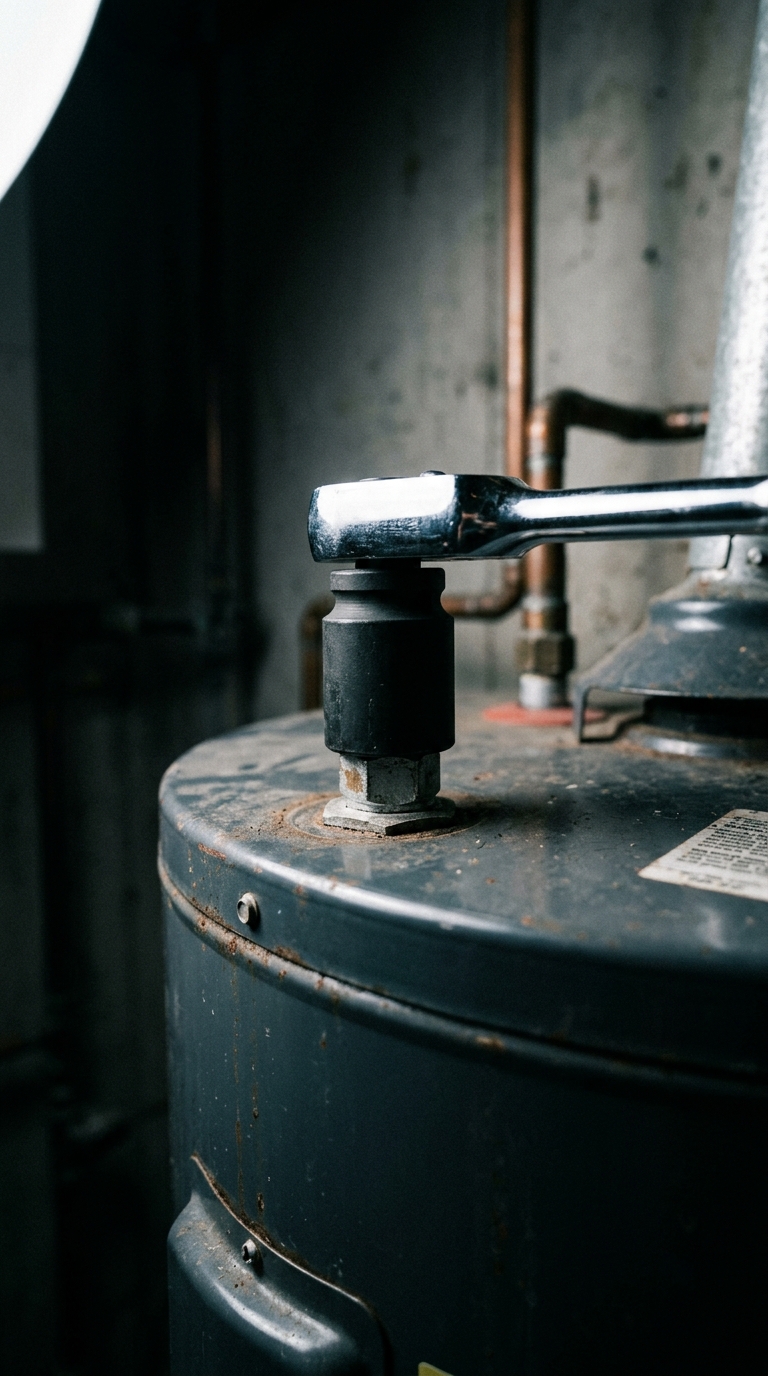
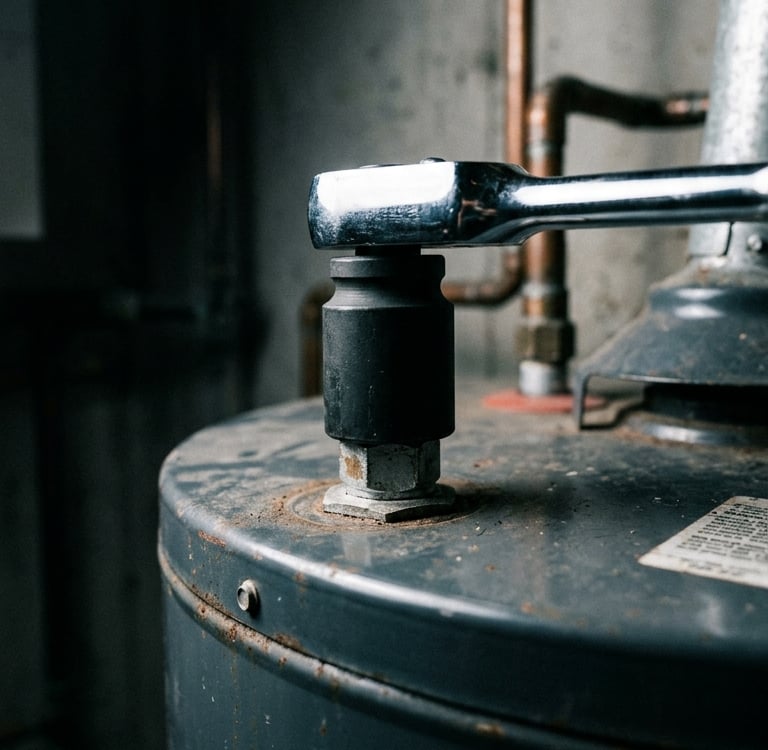
Locating the Anode Rod: On most tank-style water heaters the anode rod is accessed through a hex head plug on the top of the tank. On some models it is located under the plastic cap on top of the hot water outlet nipple. Consult your water heater's manual or the manufacturer's website if the location is not immediately visible. The hex head is typically 1 and 1/16 inch — a standard socket set will not fit. You need a dedicated 1-1/16 inch socket.
The Extraction: Apply penetrating oil around the hex head and allow it to soak for 10 minutes before attempting to loosen the rod. On tanks that have never had the rod removed, the hex head is frequently seized from years of corrosion and mineral buildup. Use a breaker bar rather than a standard ratchet — the torque required to break the initial seal can be significant. Brace the tank against the wall to prevent it from rotating. Once loosened, unthread the rod completely and extract it from the tank.
The Condition Assessment: Inspect the extracted rod carefully. A new anode rod is a solid, uniform metal cylinder approximately 3/4 inch in diameter. A depleted rod will be significantly thinner — often reduced to a wire-thin calcium-encrusted core — or missing sections entirely. If more than 50 percent of the rod's diameter has been consumed, it has been actively protecting the tank but is approaching the end of its service life. If the rod is completely calcified white or reduced to a thin wire, it has been depleted for some time and the tank may have already experienced some early corrosion.
The Installation: Wrap the threads of the new anode rod with plumber's thread seal tape — 3 to 4 tight wraps in the direction of the thread. Thread the new rod in by hand until snug, then torque it down firmly with the breaker bar. Do not overtighten — firm and snug is sufficient. A leaking anode rod port is significantly more problematic than a slightly under-torqued one.
The Refill and Relight: Close the drain valve, remove the garden hose, and slowly open the cold water supply valve to refill the tank. Open a hot water tap inside the house to purge air from the system — leave it running until water flows steadily with no air spurts. Once the tank is full, return the thermostat to its normal operating setting — 120°F is the recommended temperature for most households, balancing scalding risk against bacterial suppression. Allow the tank 1 to 2 hours to reach operating temperature before use.
The Expert Gear List
To execute this complete water heater maintenance protocol, our team deploys the following professional-grade tools and hardware. All items are available on Amazon.
Disclosure: The Retrofit Routine is a participant in the Amazon Services LLC Associates Program. As an Amazon Associate, we earn from qualifying purchases at no additional cost to you.
Diagnostics & Safety
Camco Aluminum Anode Rod: An aluminum anode rod with a solid, 42-inch rigid design that provides long-lasting corrosion protection for standard water heaters. Unlike flexible models, this full-length rod requires significant overhead clearance for vertical installation. A 1-1/16 inch socket is the mandatory tool for anode rod removal—standard socket sets do not typically include this size, and attempting removal with an adjustable wrench risks rounding the hex head permanently.
Tank Maintenance
Camco Brass Drain Valve Replacement: A heavy-duty brass ball valve replacement for the factory plastic drain valve. Plastic drain valves crack and fail to seal completely after their first use on aging tanks. Replacing with a brass ball valve during the flush protocol eliminates the chronic dripping drain valve failure that causes slow water damage in utility rooms.
Camco Water Heater Flush Kit: A purpose-built flexible hose and curved wand system designed to agitate and flush accumulated sediment from the base of the tank through the drain valve opening. Significantly more effective than a standard garden hose flush at breaking up compacted calcium sediment deposits on the tank floor.
Sealing & Thread Prep
Harvey's Thread Seal Tape (PTFE): The mandatory thread sealant for the anode rod installation. Plumber's PTFE tape applied to the rod threads before installation prevents water weeping around the port and makes future rod removal significantly easier by preventing thread seizure from mineral buildup over time.
Contact
Questions? Reach out anytime, we’re here.
© 2026. All rights reserved.
Disclosure
The Retrofit Routine is a participant in the Amazon Services LLC Associates Program. As an Amazon Associate, we earn from qualifying purchases at no additional cost to you.
The Retrofit Routine is a digital property owned and operated by Atlantic Delivery Drivers Corp.